What are UV Resistant Coated Membrane Keypads?

What are UV Resistant Coated Membrane Keypads​

Many of the user interface products designed and manufactured by CSI will eventually live in extremely harsh environments. Some being exposed to UV exposure from the sun for days, months or even years at a time. Luckily, there are methods to protect the keypad from the effects of the sun. One of these methods is using a UV Resistant Coating. 

A UV resistant coating is typically applied to the keys. The coating is glossy in appearance and looks very similar to epoxy coatings that were once used on membrane switches. The major difference between the UV resistant coating and the epoxy coating however, is that the epoxy was not durable. Over time, the epoxy not only became embrittled but it tended to discolor and yellow. 

The UV resistant coating is designed with special barrier resins and compounds that are activated with ultraviolet light. Once activated, they prevent any damage from occurring to the coating or the base material of the keypad.

The UV resistant material’s  “glossy-like” look also enhances the appearance of keypads. The glossy and clean look of the material really makes the product snap and stand out. Between the UV resistant benefits and the enhanced aesthetics, using the UV coating is really a no-brainer when designing a keypad that is going to be used outdoors. 

CSI Develops Heavy Duty Sealed Keypad

CSI Develops Heavy Duty Sealed Keypad

Product: Mounted on the outside of an auxiliary vehicle exposed to: water, dust, dirt, ice, rock bombardment, etc.

Case: Customer approached CSI with a keypad that was failing out in the field.

Product Issues:

  • Keypad failing out in the field due to moisture ingress
  • Domes collapsing
  • Graphic overlay fading from UV exposure
  • Lack of tactile response when pressing keys
  • Keypad peeling off of surface
 

CSI Final Solution:

  • 100% Environmentally Sealed Keypad (as a standalone part)
  • Durable and Ruggedized Rubber Keypad Design
  • UV Resistant Keys
  • Improved the Design & Tactility of Keys
  • Upgrade Rear Adhesive for Stronger Adhesion to Surface

Silicone Rubber Explained – Part II

Silicone Rubber Explained - Part II

CSI Keyboards utilizes molded silicone in many of our keypad designs. Silicone is truly remarkable material. Without silicone’s properties, rubber keypads would not have moving keys, be able to close electrical switches or have self positioning features. 

Part II of our Silicone Rubber Series reveals many of silicone’s basic properties that allow it to be molded into a multi-functional keypad.

Silicone Raw Material

Raw silicone starts off with the consistency of clay. The raw silicone is first mixed together with a catalyst which assists in the molding processes. Different base raw silicones are mixed together in specific ratios and formulas to achieve a very specific silicone hardness.

Silicone Hardness / Durometer

Silicone rubber keypads can be made with different hardness (also known as durometer) ranging from 30 shore A to 80 shore A durometer. Rubber bands, for instance, have a durometer of 20 shore A, plastic is about 95 Shore A or higher. Raw silicone comes in base hardness of 30, 50, 70 and 80 Shore A. The standard durometer used for a molded rubber keypad is 60 Shore.

Two raw silicones can be mixed together to achieve a specific hardness (Example: a mixture with 50% silicone at 40 Shore A and 50% at 60 Shore A will result in a final material with a Durometer of 50 Shore). The hardness or durometer is based on the purpose of the rubber such as sealing requirements, tactile force requirements, insert molded keytops, molded light blocks and pull through tabs.

Silicone Color

Without pigment, silicone has a clear but slightly milky white color. Pigments can be added to the raw silicone mixture to make parts in virtually any color. Rollers are used to integrate the pigments into the raw silicone. If a silicone rubber keypad has multiple silicone colors, each color must be prepared separately.

Matching Silicone Color

The color of the silicone rubber keypad is controlled by the amount and type of pigments used in the molding process. CSI uses the Pantone system to match silicone colors, but we can also color match parts to plastic samples or color chips. Because of silicone’s unique texture, it is possible that the keypad will not color match in certain lighting conditions. This is called metamerism. In this case, the pigment formula can be slightly changed (example: made darker or more blue). Once the color is approved, the pigment formula is locked in assuring consistent color throughout production and life of the rubber keypad product.

Transparent & Tinted Silicone

Raw silicone without pigments will appear transparent (clear) or slightly milky white after molding. This is perfect for backlighting the keypad whether backlighting indicators, nomenclature or symbols. Using a tiny amount of pigment, the silicone can be made mostly transparent with a slight color tint. By varying the pigment color and amount, the tint can also be varied from highly transparent to virtually solid.

Silicone Rubber Explained – Part I

Silicone Rubber Explained - Part I

Silicone rubber is an elastomer (rubber-like material) composed of silicone (itself a polymer) containing silicon together with carbon, hydrogen, and oxygen. Silicone rubbers have become widely used in the keypad industry, and there are multiple formulations. Part I of our Silicone Rubber Series will detail these formulations.

Silicone rubbers are often one- or two-part polymers, and may contain fillers to improve properties. Typically the silicone rubber contains properties called “Organosiloxanes Polymer” which have originated from its unique molecular structure that can carry both inorganic and organic rubbers. Due to the Si-O bond of Silicone Rubber and its inorganic properties, Silicone Rubber is superior to ordinary organic rubbers in terms of heat resistance, chemical stability, electrical insulating, abrasion resistance, weather ability and ozone resistance etc. The silicone rubber compounds are used in various ways of application such as rubber keypads, industrial rolls, wires, thermal conductive pads, medical products, kitchenware, etc.

With these unique characteristics, silicone rubber has been widely used to replace petrochemical products in various industries like aerospace, munitions industry, automobile, construction, electric and electronics, medical and food processing industry. Recently, these scopes of silicone applications have been expanding at a great speed by the high demand of industries that require a more reliable elastomer.

HTV Silicone Rubber

Silicone Rubber is classified into HTV Silicone Rubber (High Temperature Vulcanization Silicone Rubber) and RTV Silicone Rubber (Room Temperature Vulcanization Silicone Rubber) by its curing temperature. Also, HTV Silicone Rubber is divided into Millable Type Silicone Rubber and Liquid Type Silicone Rubber by its degree of polymerization.

Millable Type Silicone Rubber (High Consistency Silicone Rubber)

Millable Type Silicone Rubber is composed mainly of Polyorgarnosilioxan (Silicone Polymer) and Silica with various additives to grant diversified characteristics. We call this stage of Silicone Rubber as “Base Compound”. This “Base Compound” is catalyzed, pigmented with a roll and cured by press molding and extrusion etc. Millable Type Silicone Rubber is also typically called as “HCR (High Consistency Silicone Rubber)”.

Liquid Silicone Rubber

LSR is Liquid Type and High Temperature Vulcanization Silicone Rubber. LSR differs from Millable Type Silicone Rubber and RTV (Room Temperature Vulcanization) by its degree of viscosity and curing temperature. LSR (Liquid Silicone Rubber) is perfect rubber material for automated injection molding due to its excellent liquidity. Also, LSR (Liquid Silicone Rubber) is ideal for complex molds, demanding design and tolerance because it can easily fill the most complex part of a mold.

Intro to Compression Molding Silicone for Rubber Keypads

Intro to Compression Molding Silicone for Rubber Keypads

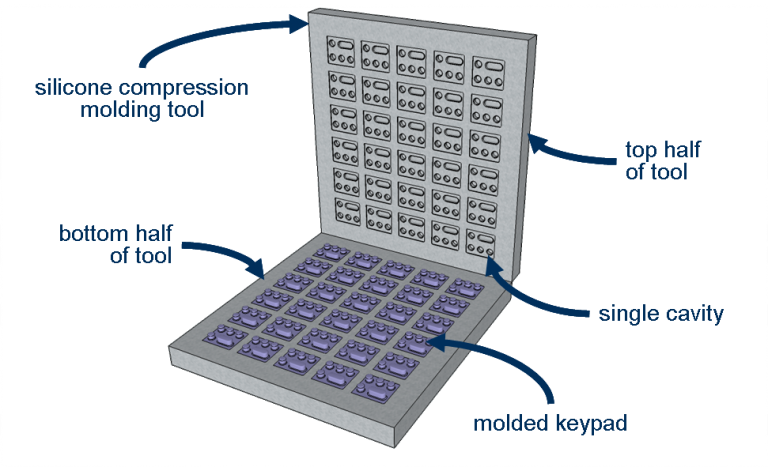
Rubber keypads are made using compression mold tooling. Compression molds have a bottom tool and a top tool (think of a waffle iron). First, the mixed raw silicone material is cut into precise cut slabs. The material is then laid into the mold set. Pressure, heat and time are used to transform the material to the shape of the cavity. The parts are removed from the tool, flash is hand torn and then the parts are post-cured to remove any residual catalyst material.

Material Set-Up

The mixed and pigmented raw silicone material must be carefully placed in the mold to ensure that enough material fills the cavity, and not too much material prevents the mold from overflowing. This is achieved by rolling the raw material to a specific thickness and width. Next an automated machine pulls and cuts the material into equal sizes. The cut pieces are weighed to ensure that their volume will correctly fill the cavity.

Vulcanization

The cut pieces are laid into a pre-heated mold, and the mold is closed. Alternative molding methods requires a different process. Typical cycle time for silicone keypads is about 5-10 minutes – which is much longer than typical plastic molding. Multiple cavities are used to increase output (having 140 cavities is not uncommon). Inside the tool, heat and time transforms the silicone mixture. First the raw silicone liquefies, filling the cavity. Next the material hardens in what is called the vulcanization process. Here the molecules of the material cross-link, permanently transforming the part into its finished shape. After vulcanization, it is not possible to revert back to the original silicone material.

Flash

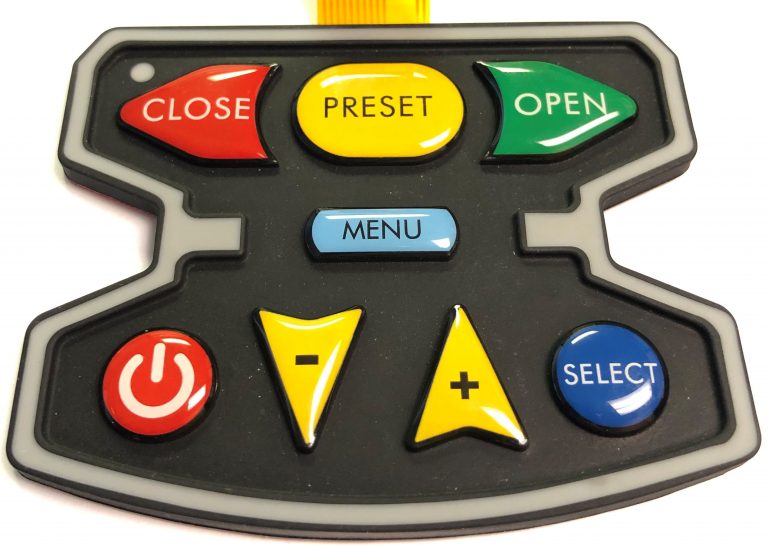
Because the raw material liquifies, and must fill the entire cavity, the mold is design with overflow channels, which is why there is flash. All regions where the top of the tool meets the bottom, there will be flash. This includes the perimeter and any opening. The flash is easily removed by hand. Note that on all parts, there will always be a flash line with a small amount of silicone flash (less than 0.3mm) remaining.

Post Curing

Some residual catalyst material from the raw silicone may not have fully vulcanized and can remain in the part. Over time, this residual will leach out, depositing on the electrical contacts and potentially affecting keypad function. To prevent the post-cures keypads after they are molded. During post curing, the parts are placed in an oven to heat and evaporate any non-vulcanized catalyst. 

Modifying Tools

Because of flashing, it is highly difficult to add inserts in compression tools. It is far easier to simply remove steel from the tool.For this reasons the initial design of the part must be made with careful considerations to tool modifications. Existing molds can have steel cut away (adding material to the part), but steel shouldn’t be added to the tool (remove material from the part). In the latter case, a new bottom and/or top half of the tool must typically be machined.

What Types of Components can be Integrated into a User Interface?

What Types of Components can be Integrated into a User Interface?

Designing a user interface or HMI assembly can be overwhelming and time consuming. That’s why CSI Keyboards has become the one stop shop for human machine interface (HMI) and front panel interface assemblies. CSI Keyboards has over 35 years of experience specializing in the integration of the below technologies into complex user interface turnkey keypad assemblies. Our broad product line and engineering expertise allows for us to design and manufacture fully integrated interface solutions at a lower cost and better flexibility for the customer. Customers all over the world rely on CSI Keyboards’ expertise to design, manufacture, and assemble the whole turnkey user interface.

From membrane switches and elastomer rubber keypad assemblies, to touch screens and touch panels integrated with displays, CSI Keyboards specializes in designing and fully integrating a variety of components and customized parts into a complete custom turnkey keypad assembly and user interface for your company. We can take your concepts and bring your product to fruition providing you with the complete plug and play keypad package from one dependable and experienced source. 

Benefits of a Full Turnkey HMI Assembly

  1. Minimizes the amount of moving parts for our customers but also overall time and cost.
  2. Allows our customers the ability to place one single purchase order under one single part number for the entire interface.
  3. Saves our customers endless engineering hours by leaning on CSI’s engineering expertise.
  4. Our longstanding supplier relationships and over 35 years of manufacturing and assembly expertise provides increased control and lower costs for your company.

So What Can Actually be Integrated into my HMI?

The following is a list of some of the components and electronics that we’ve integrated into some of our HMI and User Interface Assemblies:

  • Value-Added Membrane Switch Panel and Turnkey User Interface
  • Fully Loaded PCBs (printed circuit boards)
  • Integrated Touch Screens
  • Integrated Displays
  • Integrated Display Windows
  • Optical bonding and adhesive bonding for touch screen + display solutions
  • G10 Backers
  • Metal Backers
  • Flexible Circuits
  • Enclosures and Housings
  • Bezel Integration and Assembly
  • Connectors
  • Cable Assemblies
  • EMI / ESD / RFI Shielding
  • Barcode scanners

What Are Discrete LEDs and How Are They Utilized?

What Are Discrete LEDs and How Are They Utilized?

Discrete LEDs are surface mounted LEDs that are typically either lit individually or together to illuminate a small area. They are ideal for lighting small icons and indicators. They are popular in many user interface designs due to their low cost and thin construction.

However, there are situations when discrete LEDs are not suitable for an application or design. The biggest issue is that they can create hotspots (bright areas) over or near the LED. As a result, they aren’t ideal when lighting larger areas because the backlighting is often inconsistent with some areas brighter than others. 

There are a couple of ways to avoid hotspots in your design. The first way is through the use of an elastomeric or silicone rubber faceplate overlay (versus polyester/polycarbonate). Elastomer is a great conductor of light and therefore allow for excellent light dispersion across a large area using discrete LEDs. 

If you prefer to use a polyester or polycarbonate overlay, CSI could also utilize side firing LEDs and light guide film to backlight a larger area. Other options are fiber optic technologies, or EL panels.

Laser Etching and How it’s Used to Backlight Rubber Keypads

Laser Etching and How it's Used to Backlight Rubber Keypads

When a rubber keypad or rubber membrane switch calls for backlighting, you may often hear the term “laser etching” being used. Laser etching refers to a process in which a high powered laser is utilized to remove a layer or layers of paint on a keypad. 

A standard rubber keypad is simply printed to add graphics or nomenclature. This method will suffice as long as the keypad is not backlit. It’s a cheap and easy way to create letters, numbers, and special characters on keys, making it the preferred choice among many companies. But in order to backlight molded rubber, the rubber must be laser etched: which is a newer, more advanced method for producing backlit nomenclature, graphics, indicators, etc.

The molded rubber typically starts off as a translucent, milky-like color and is then painted with opaque colors designed into the part. The rubber is then laser etched down to the translucent layer(s) of the keypad that will eventually be backlit with LEDs. The laser is carefully guided across the surface of the key, burning away paint in select areas. After the paint has been removed, it reveals the translucent layer below. The result is a contrasting translucent and opaque color, making the backlit areas pop with a higher level of crispness, brightness and visibility.

Laser etched keypads are extremely rugged and durable. The combination of molded light blocks inside the part and the laser etched nomenclature on the faceplate make for an unmatched backlit keypad.

What are Carbon Pills in Rubber Keypads?

What are Carbon Pills in Rubber Keypads?

A typical silicone rubber keypad involves designing a flex wall around the perimeter of the button. When the key is pressed, the flex wall flexes and produces a tactile response (similar to a spring). When the key is fully pressed, the flex wall allows the center of the key to make contact with the circuit. 

In rubber keypads, there are typically two methods of making contact with the actual switch: dome switches or conductive carbon pills. Conductive carbon pills are typically manufactured from a silicone conductive material that contains carbon. Conductive pills are molded into the actuators of the keys. When the carbon pill makes contact with the circuit, it is closing the circuit on a printed circuit board or flexible circuit trace. 

Conductive carbon pills are usually silicone based and can be round, oval, or rectangular in shape. Carbon pills can range in size depending on the size of the key but typically available from 2.0mm to 8.0mm in diameter. Multiple carbon pills can also be utilized and designed into the part to ensure solid contact is made depending on the key shape, size and design of the keypad.

Epoxy Key Top Coating for Rubber Keypads

Epoxy Key Tops for Rubber Keypads

Epoxy key top coating is a protective clear epoxy resin coating applied to only the silicone rubber key tops. This thick coating gives keys a hard plastic feel and glossy appearance. Epoxy coating can extend the longevity of key top artwork as it has abrasion resistance and protects the tops of the keys from chemicals, dirt and oils. 

The epoxy key tops can really make your product stand out from the competition as it is more visually appealing than standard rubber key tops. The keys have a plastic appearance but producing the epoxy coated rubber keypads is considerably less cost than manufacturing plastic keys. We recommend epoxy key top coating for keys that receive a high number of actuations or applications that are exposed to abrasion. Additionally, the epoxy coated keys can also be backlit similar to a standard rubber keypad. The rubber is laser etched prior to the epoxy being applied to the key tops.