The CSI Process

The CSI Process

Concept: The process typically starts with a customer concept which can range from something as simple as a description or a sketch with a list of requirements right up to full keypad drawings.

Design: Once we have enough information on the design, we work up a quote and proposal for the project.  CSI then works on a drawing package which typically takes about 2 weeks depending on complexity of design.  During those two weeks, we are interfacing back and forth with customer. 

Prototype: Once customer signs-off on the design, we built prototype parts which takes about 4-5 weeks.  Because it’s a custom product, there are usually some minor tweaks that take place during the prototype stage such as tactile feel of keys, colors, etc. 

Production: After prototypes are approved, we enter into production. 

Logistics: Work closely with our customer’s procurement team to ensure the customer receives the product when and where they need it. 

Sustainability: After the part has entered into production, CSI sustains and supports the user interface throughout the life of the product.  CSI is still supporting products that were originally designed 37 years.  Some products having gone through some design improvements, while others being built exactly as they were in 1983.

Membrane Switch Connector Options

Membrane Switch Connector Options

Membrane switch connectors connect the keypad to the actual product, device or machine. Connectors consist of both contacts and molded plastic housings. Membrane switches are typically designed with flexible tails that are cut from the circuit material which is inserted or connected to a printed circuit board with a variety of connectors. Alternatively, the tail can be designed and prepared to connect with a Zero Insertion Force (ZIF) connector on the customer’s PCB. ZIF connectors have become extremely popular and industry norm. If the membrane switch is not flexible circuit based but instead, a PCB based keypad design, a flexible tail can be hot-bar soldered to the PCB or any connector can be soldered directly to the printed circuit board. Although both are rarely used in the modern era, solder tabs and discrete wires are both additional options.

Connector Options:

Most Common Options:
Bare Tail: connects to .100” center ZIF style connector
Female Standard Connector: connects to a .100” center, .025” square posted header
Female Latching Connector: connects to a .100” center latching header

Bare Tail for ZIF Connector

bare zif connection membrane switch

Female Standard Connector

female connector membrane switch

Female Latching Connector

female latching connector membrane switch
Other Options:
  • Male Standard Connector: interfaces to a .100” center female header
  • Male Latching Connector: interfaces to a .100” center latching header
  • Solder Tabs: .100” centers and can be directly soldered to PCB or wires
  • Discrete Wires

ZIF Connectors

ZIF connectors are assembled to the PCB end and therefore there is no physical connector on your membrane switch side (the end of the flex tail is bare). ZIF connectors typically have a low profile, are lightweight, secure, and removable connections. ZIF connectors are appropriate for more complex applications and allow for higher levels of integration. The tail of the circuit is inserted into the ZIF connector to create the contact, and a stiffener is laminated under the tail to ensure stability and maintenance of the electrical contact. ZIF connectors may have anywhere from 2 to 30 positions on a single row, and distances of between 1mm and 2.54 mm are available.

Crimpflex & Memcon Connectors

Crimpflex and Memcon connectors conform to Berg, Molex, and Amp membrane switch connecting specifications by utilizing common pins in a specific housing to meet connection requirements. The Crimpflex and Memcon crimping presses are dedicated to the manual and pneumatic crimping of male and female contacts and are known for their reliability, ruggedness, simplicity of use, speed, and precision. The contacts ensure mechanical retention and electrical contact by piercing the conductor in six points. The contacts are available in male, male solder tab, and female versions; the female contacts are selective gold or tin-plated. Standard housings are available in the OF series, which fits with the most common interfaces, or the OM series, which interfaces with cables and comes with an locking system that can be oriented to meet your specifications.

Hot Bar Soldered Tails

This type of connection has become very common with printed circuit board based membrane keypad and membrane switch designs. A copper flex tail is hot bar soldered directly to the PCB. The tail can then be inserted directly into a ZIF connector on the customer’s PCB. Allows for a lot more flexibility in the design and tolerance when plugging the tail into the board versus using a connector.

Male, Female, or Solder Tab Housings

These types of connectors are considered to be more reliable against heavy shock and vibration. They also are known for more ease of assembly. With a much larger connection, male, female, and solder connectors have pins crimped to the circuit and are available with many different housing features. The tail pitch is available in .100” spacing.

Membrane Switch Construction

Membrane Switch Construction


Typically a membrane switch assembly typically consists of six to seven main layers:


  1. Graphic Overlay – Graphic overlays are typically constructed of polyester, the material of choice due to its superior chemical resistance and flex life compared to polycarbonate. CSI can either digitally print, screen-print, or employ a combination of both methods to insure you get the right colors, textures, and finishes your Silver Flex membrane switch design requires.
  2. Overlay Adhesive – The overlay adhesive layer bonds the graphic overlay to the top circuit layer. This overlay adhesive is typically an acrylic adhesive, selected for its durability and ability to maintain adherence in atypical environments, such as moist environments.
  3. Top Circuit Layer – Typically a .005″ – .007″ heat-stabilized, polyester printed layer with silver-filled, electrically conductive inks and dielectric inks. This layer can also encapsulate metal domes or incorporate polydomes, which are used to achieve tactile feedback, an important design consideration impacting usability.
  4. Circuit Spacer – This layer separates the top circuit from the bottom circuit, so the switch remains normally open until the keypad is pressed. The circuit spacer is a polyester spacer with adhesive on both sides.
  5. Bottom Circuit Layer – The lower circuit layer is typically a .005″ – .007″ heat-stabilized, polyester-printed layer with silver-filled electrically conductive inks and dielectric inks. This layer terminates as a flexible tail that serves as the interconnect to controller PCB’s or other electronics.
  6. Rear Adhesive Layer – This adhesive layer bonds the entire membrane switch package to the product enclosure, housing, or to a rigid support panel. CSI can specify the appropriate adhesive type and thickness to bond your membrane keypad to your equipment.
  7. Rigid Support Layer – This optional layer can add structural integrity to the membrane switch assembly. Materials can be aluminum, FR-4, steel, etc. Mounting hardware such as studs and standoffs can also be utilized in this layer.

General Considerations When Designing a Membrane Switch

General Considerations When Designing a Membrane Switch


Environmental

• What temperature and humidity range will this product experience?
• What types of contaminants or chemicals will come into contact
with this product?
• Will this product be subjected to moisture and/or U.V. exposure?

Mechanical

• Will tactile response be required?
• To what material will the switch be laminated?
• What number of actuations will this product receive?

Electrical

• How many contact points will there be?
• What type pinout or matrix will be used? (common bus, X-Y matrix)
• What closed loop resistance will be acceptable?
• Will electrostatic or EMI shielding be necessary?

Appearance

• Will edges be exposed, recessed, or covered with a bezel?
• Will embossing be required?
• Will there be different parts to the same product? (sets)
• How many colors will be needed?

What is Required for Creating a Membrane Switch Blueprint? 

Blueprint for Designing Membrane Switches


  • Overall size of the part
  • Keypad centers
  • LED locations
  • Diameter of corners
  • Size and Location of Cutouts
  • Size and Location of Windows
  • Location of Tail Exit Point
  • Location of Graphic Entities
  • Electrical Schematic
  • Identify “Pin 1”
  • Color specifications
  • Tail location and length

Benefits of Using Membrane Switches

Benefits of Using Membrane Switches


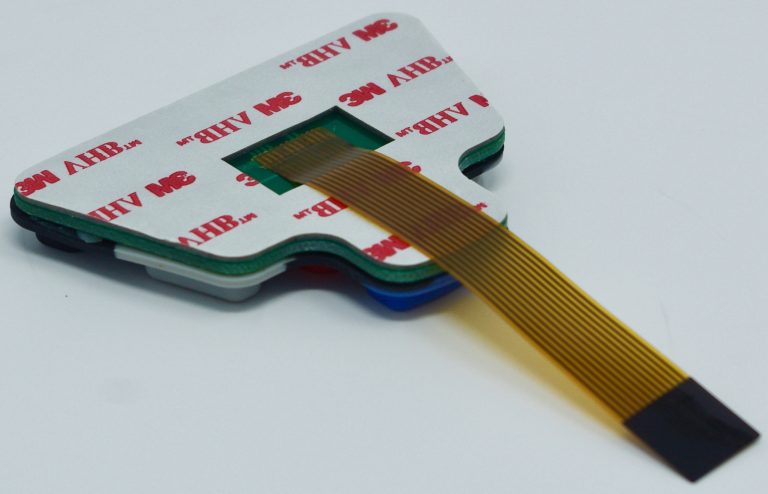
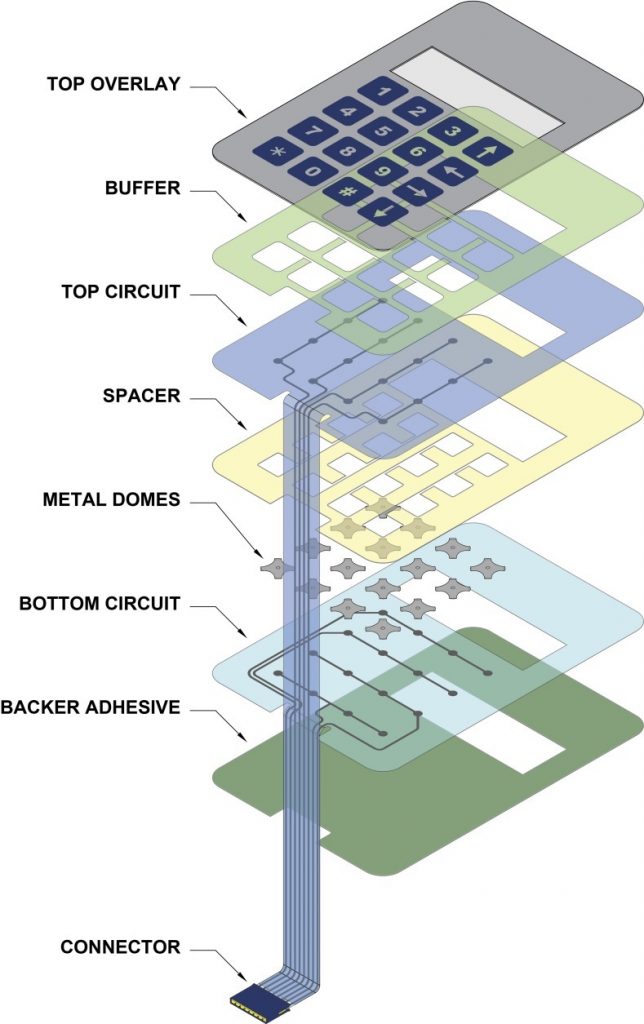
Thin Construction: Membrane switches are extremely thin in construction, especially in comparison to other technologies such as mechanical switches.

Environmentally Sealed Construction: Membrane switches can be designed with a sealed construction design preventing moisture or contaminant ingress.

Low Profile: Membrane switches have a low profile surface which allows for easy cleaning.

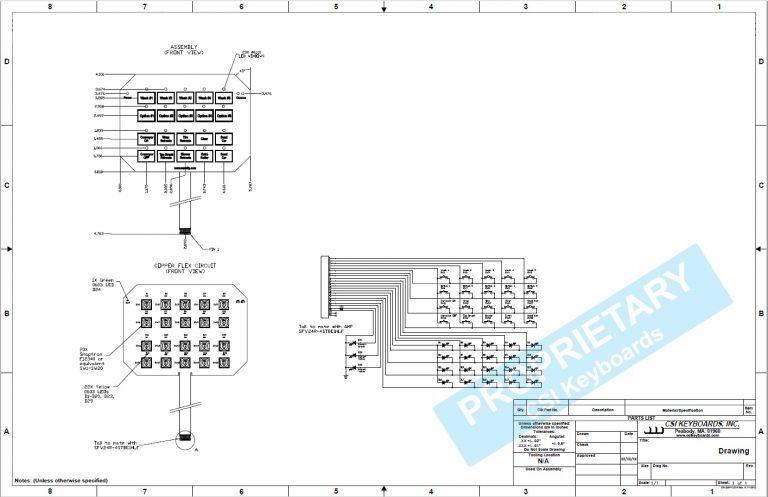
Cost Effective: Membrane switches are extremely cost effective especially in comparison to other user interface technologies. 

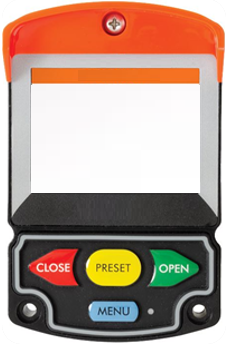
Customizable: Membrane switches are easy to customize, giving customers the ability to achieve the look and feel that they desire including customizable graphics, domes, keys, texture, size/shape, windows, etc.

CSI Keyboards to Exhibit at the MDM BIOMEDevice Show

CSI Keyboards to Exhibit at the MDM BIOMEDevice Show

For the fifth year in a row, CSI Keyboards will be exhibiting at the MDM BIOMEDevice trade show at the Boston Convention Center on May 15th and 16th. Come visit us at Booth 928.

The trade show consists of three expos: BIOMEDevice; Design & Manufacturing; and the Embedded System Conference.

BIOMEDevice focuses on the medtech research, development and products that matter to you, get continuing education experience to keep you current in the industry and on the job. Then explore innovations, source products, and make important connections. 

Design & Manufacturing (D&M) New England is your entryway to the most advanced technologies on the market, from design software and biotech solutions, to contract manufacturing, automation, and robotics. Walk the entire expo floor and meet face to face with thousands of peers while gaining valuable insights from industry pros across the medtech, design and manufacturing, and embedded systems spectrum.

Spanning the embedded systems spectrum, the Embedded Systems Conference brings together engineers searching for solutions with leading suppliers whose products can reduce cost and efficiency.

Reverse Engineering Membrane Switches

Reverse Engineering Membrane Switches

There are two main types of engineering: forward and reverse. Forward engineering is the prototypical process whereby a product moves from an abstract idea to a physical object. This can involve many processes depending on the final product, including drawing approvals, material selection, and choosing a cost-effective production method. Ideally, documentation is organized and protected at every step of the way.

Reverse engineering, on the other hand, takes a previously-produced product and works backward through the process to create design documentation. Reverse engineering is typically required in instances where there are no available drawings, to replace lost documentation, move a prototype to mass production or recreate a product that is no longer available on the market.

Reverse engineering a membrane switch, molded rubber keypad or graphic overlay starts with taking an existing sample part, extracting design data, and creating an improved copy of the engineered keypad. The new keypad can be placed onto the existing machine or controller and the life of the equipment is now extended for years to come. CSI can even reproduce membrane switches that have been worn from continued use. By providing a sample, CSI Keyboards can recreate a new membrane switch, extending the effective life of the product to which it attaches. The cost for reverse engineering and replacing the keypad is much less than the cost of buying new equipment or the cost of not being able to run your machinery. 

Dead Front Membrane Switch Integration

Dead Front Membrane Switch Integration

Looking to make your membrane switch or only portions of your membrane switch visible only when lit?  You’ve come to the right place. CSI Keyboards has been integrating dead front technology into our keypads and user interfaces for over 35 years.

CSI Keyboards manufactures dead front membrane switches and backlit overlays that deliver sleek and intuitive interfaces at a very reasonable price point. Icons and/or nomenclature stay dark/invisible to the user’s eye until the membrane switch backlighting is activated. CSI’s thin backlighting technology can be integrated inexpensively into new designs or product upgrades using various flexible or rigid graphic layer materials.

Dead front membrane switches can be created with either printed inks or by adding diffusing layers to the membrane switch itself. Successful integration of the graphic overlay with the membrane switch electronics dictates a custom membrane switch for almost all applications.

Dead front membrane switches can be produced in rich color to promote your brand or increase product aesthetics. Dead front membrane switches can be produced with almost any background color with black being the most common. You can incorporate just one LED light color or have multiple LED light colors within a single display.


Advantages of Using Light Guide Film for Backlighting Membrane Switches​

Advantages of Using Light Guide Film for Backlighting Membrane Switches

Light Guide Film is designed to evenly distribute light from top or side firing LEDs, providing bright, uniformed illumination. It also reduces the amount of LEDs needed, saving power consumption. More on light guide film technology below. The design and utilization of light guide film (LGF) technology has become one of the most common methods of interface backlighting. CSI Keyboards uses proprietary techniques to design the light guide film so it is optimized for light redirection and reflection giving the customer the brightest possible backlighting solution. Light guide film dots are also designed and implemented which allow for the optimization of light distribution to obtain maximum brightness and uniformity. Common problems that many of our competitors face are light leakage and hot spots. CSI’s backlighting designs prevent any light leakage and hot spots from occurring, and also result in much brighter light guide film and interface.

The design typically consists of 1-4 side-firing LEDs as the light source. Hot pressing optical patterns or micro lens on the surface of the PC film to refract lights guided by the PC film. It can be easily assembled with dome switch or molded in keypad. 

The Features and Advantages of Light Guide Film are as follows:

Slim & Sleek Design

1. PC/PU/TPU film with optical pattern design (.125 – .30 mm thick)

2. Surface light source

3. High uniformed brightness

Cost

1. 50% cheaper than EL panels

2. 40% cheaper than using standalone LEDs

Energy Consumption

1. 6 LEDs light: 90mA. (LED: 15mA/pcs)

2 . LEDs + LGF: 40mA. (LED: 20mA/pcs)

Durability

1. LED light source offers 50,000 hours of life.

2. PC film is extremely durable and can function in bothhigh or low temperatures.

Use the Light Guide Film (LGF) for Keypads or LCD backlighting allows for backlighting only where needed. The CSI solution allows for uniform distribution of light regardless of the distance from LEDs. It also allows for segmentation of areas to avoid light leakage between areas or colors.